New to QMK, or in for a refresher? In this series of tutorials on QMK Basics, you’ll be brought up to speed on a number of features that help you customize your keyboard just the way you want it.
You’ve just begun using your new programmable keyboard and you’ve followed QMK’s Complete Newbs Guide. There is a lot you can tweak and do in QMK, but it’s not always easy to find how to do something. With this series I intend to add some common steps to the Complete Newbs Guide so that you’ll be able to find your way around the framework more easily.
This guide is intended for people for people that are new to QMK and keyboard firmware in general. If you are experienced, there’s some more in depth reading down below at Further reading.
Your keymap is one of the most important files for your keyboard. It defines most of the behaviour that you want your keyboard to do when you press, tap or hold your keys. Layers are one of the most used ways to modify that behaviour.
Table of Contents
To start
This guide assumes you’ve followed the Complete Newbs Guide. Doing so will mean you’ve got your development environment set up so you can compile and flash your firmware (with the keymap) to your keyboard. It will also mean you’ve made you own keymap by copying your keyboard’s default keymap.
A primer on Layers
The section Working with layers provides some very helpful tips about layers, be sure to give it a read. How layers work specifically is covered in the article Keymap Overview. Since this is meant to be an introducory article, I’d like to give a short explanation as to how layers work without diving into the nitty gritty details.
What is a layer?
A layer is an array containing keycodes. It’s the place where you’ll start out customizing what your keyboard does: layers are used to determine what each key should do when pressed. Below is an example of a simple keymap, containing the keycodes for a macro pad with five keys.
A good example of layers is the function layer on most laptops. When you press the FN key, the keys will do something different when pressed, such as controlling the volume or skipping songs. Some keyboards might even have a numpad when you press the FN key.
Layers in QMK allow you to define your own layers, making each key do exactly what you want.
The default layer
To start with, each keyboard has a default layer. For most keyboards, QWERTY will be your default layer, the same like when you don’t hold the function key on a laptop pressed.
You can have multiple default layers if you want. This is useful for when you want to have alternate keyboard layouts on the same board, like Colemak or Dvorak. You could also make layers specific to a an activity you do frequently, like having all keys relevant to a game on a default layer.
Other layers
You can define more than one layer. When reading through the documentation, you’ll find that some QMK advanced keycodes will work with up to 16 layers. This includes both default- and non-base layers.
How layers work
Layers form a stack. Each layer should have a unique number. The first layer often starts with the number 0, other layers get increasingly higher numbers. You should number your layers from 0 to 15 to start with, though you don’t have to use them all: having a few layers is perfectly fine.
Layers play an important role into deciding what the keyboard does when you press a key. Or rather, active layers play a role: layers by default won’t do anything unless you make them active. There is always one layer active: the default layer. If you have multiple default layers, only one can be active at a time.
MO(layer) momentarily activates a layer, for as long as you hold the key. This is just like how the FN key works on most laptops.
TG(layer) toggles a layer on or off, so you won’t have to hold a button down to use the layer.
There are more ways to toggle layers, just follow the link above. These two are good to start out with, just know that there’s probably a keycode that can do what you want when it comes to layers.
If you define multiple of those keycodes on your default layer, it’s possible for more than one layer to be active at the same time. So how does your keyboard know what it should do when you press a key?
A quick peek inside QMK
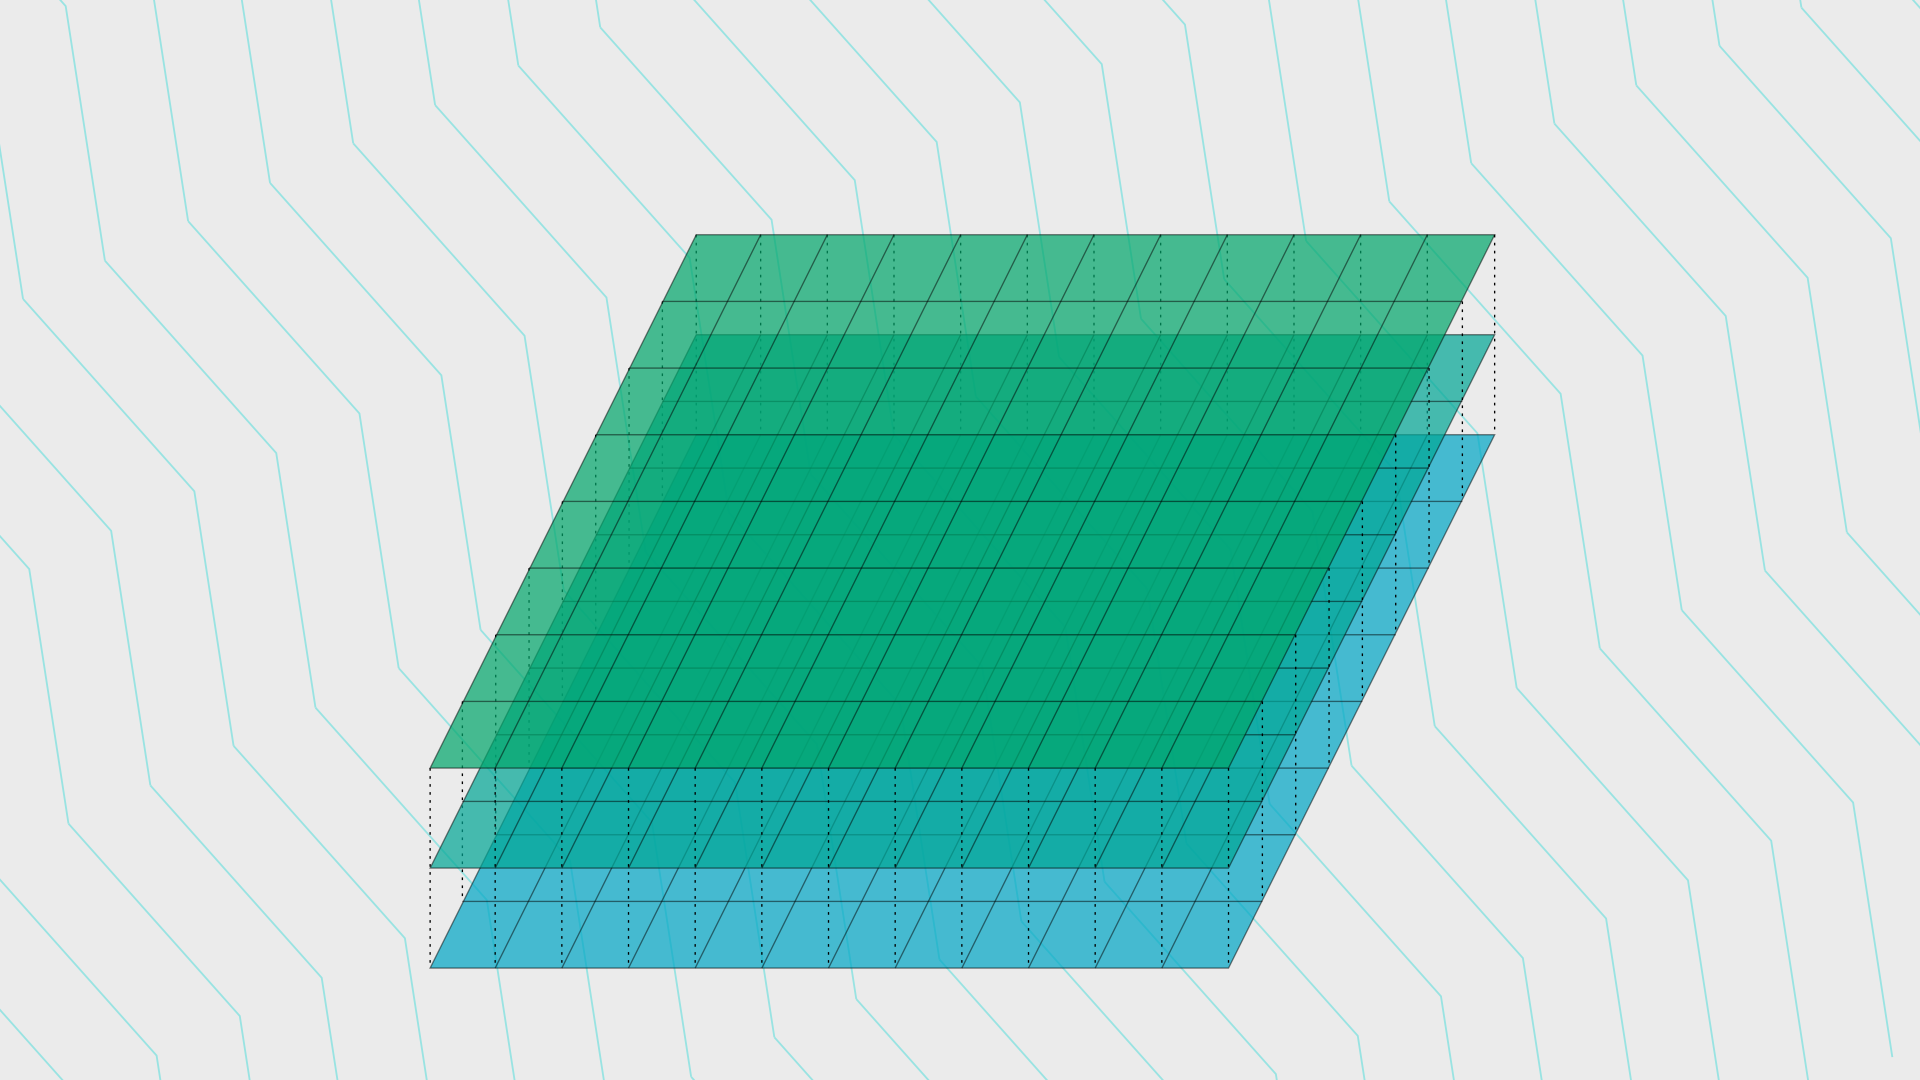
In the example below I’ve defined three small layers for a macro pad. Let’s say we press the key on the bottom left, what happens?
When you press a key, QMK goes looking through the stack of layers, starting at the top: the layer with the highest number. It checks to see if the layer is active, meaning that we pushed a button like MO(2) to activate the layer, or that we activated the layer programatically. In this case, we didn’t, so QMK keeps looking. The top two layers aren’t active.
Since we haven’t explicitly set a default layer, the layer with the lowest number will be our default layer. The default layer is always active, and so QMK finds the keycode KC_Z, and so it will send the letter Z to the computer.
A simplified diagram showing three layers. The layout of each layer is the same (they all contain four keys), but the keycodes within each layer can be different.
You have to define a keycode for every key on a layer, but that doesn’t need to mean every key will do something. In the Special Keys section of the documentation, you’ll find KC_NO which is a keycode that does nothing, and KC_TRANSPARENT which means that QMK will see through that layer in order to find a keycode to send.
Best practises
Under Working with layers in the documentation are some very good rules to follow, especially if you are new to layers. I’ll note two of those tips below:
Define your lowest, default layer, with the number 0.
On a layer, when you use a keycode like MO(layer), only refer to layers that have a higher number than the layer you’re on.
How to add a layer?
Now that you know how to work with layers, it’s time to add a layer to your keymap. If you’ve followed the steps in the Complete Newbs Guide, chances are that you already have a few layers in your keymap.
You’ll find your keymap at /keyboards/name_of_your_keyboard/keymaps/name_of_your_keymap/keymap.c.
Let’s start with a basic keymap for this example. Your keymap might contain more functions, but the basics from this example should still be there:
In the example above, the layer number is on line 4: in [0] = LAYOUT(, 0 is the layer number. You can add a #define to your code to make it easier to refer to your layers, like so:
See how we now also refer to the layer in the keymaps variable by its name _BASE rather than its number.
Add your layer
To add a layer, simply copy an existing layer and choose a different number for the index. It’s a good idea to pick a number that’s not yet used for a layer between 0 and 15.
Add your layer to the keymaps variable like below. You can use any keycodes on your new layer, like basic keycodes and advanced keycodes.
Optionally add a define to easily refer to the layer, like this: #define _MY_NEW_LAYER 4 if it’s the fourth layer, for example.
Switching to your layer
There are multiple ways to switch to a layer. The most used one is to add a keycode to your layer to do so. You can find these keycodes under Switching and toggling layers.
In the example above, I added one of those keycodes to the _BASE layer: MO(_MY_LAYER). This switches to _MY_LAYER as long as that key is held down. In the new layer, for the same key, I made the key transparent, since I can’t use that key for other things when holding it down.
Conclusion
Layers are the most used way to define what each key does on a keyboard. You can have multiple layers, of which always one layer is active. You can add various keycodes to make layers active. QMK uses active layers to determine what key to send to the computer.
You now know how to add a layer and how to switch to that layer.
Further reading
All the links below point to the QMK documentation:
New to QMK, or in for a refresher? In this series of tutorials on QMK Basics, you’ll be brought up to speed on a number of features that help you customize your keyboard just the way you want it.
You’ve just begun using your new programmable keyboard and you’ve followed QMK’s Complete Newbs Guide. There is a lot you can tweak and do in QMK, but it’s not always easy to find how to do something. With this series I intend to add some common steps to the Complete Newbs Guide so that you’ll be able to find your way around the framework more easily.
This guide is intended for people for people that are new to QMK and keyboard firmware in general. If you are experienced, there’s some more in depth reading down below at Further reading.
Your keymap is one of the most important files for your keyboard. It defines most of the behaviour that you want your keyboard to do when you press, tap or hold your keys. Layers are one of the most used ways to modify that behaviour.
Table of Contents
To start
This guide assumes you’ve followed the Complete Newbs Guide. Doing so will mean you’ve got your development environment set up so you can compile and flash your firmware (with the keymap) to your keyboard. It will also mean you’ve made you own keymap by copying your keyboard’s default keymap.
A primer on Layers
The section Working with layers provides some very helpful tips about layers, be sure to give it a read. How layers work specifically is covered in the article Keymap Overview. Since this is meant to be an introducory article, I’d like to give a short explanation as to how layers work without diving into the nitty gritty details.
What is a layer?
A layer is an array containing keycodes. It’s the place where you’ll start out customizing what your keyboard does: layers are used to determine what each key should do when pressed. Below is an example of a simple keymap, containing the keycodes for a macro pad with five keys.
const uint16_t PROGMEM keymaps[][MATRIX_ROWS][MATRIX_COLS] = {
  [0] = LAYOUT(
    KC_1,  KC_O,  KC_K, \
      KC_TAB,  KC_SPC   \
  ),
};
A good example of layers is the function layer on most laptops. When you press the FN key, the keys will do something different when pressed, such as controlling the volume or skipping songs. Some keyboards might even have a numpad when you press the FN key.
Layers in QMK allow you to define your own layers, making each key do exactly what you want.
The default layer
To start with, each keyboard has a default layer. For most keyboards, QWERTY will be your default layer, the same like when you don’t hold the function key on a laptop pressed.
You can have multiple default layers if you want. This is useful for when you want to have alternate keyboard layouts on the same board, like Colemak or Dvorak. You could also make layers specific to a an activity you do frequently, like having all keys relevant to a game on a default layer.
Other layers
You can define more than one layer. When reading through the documentation, you’ll find that some QMK advanced keycodes will work with up to 16 layers. This includes both default- and non-base layers.
How layers work
Layers form a stack. Each layer should have a unique number. The first layer often starts with the number
0, other layers get increasingly higher numbers. You should number your layers from0to15to start with, though you don’t have to use them all: having a few layers is perfectly fine.Layers play an important role into deciding what the keyboard does when you press a key. Or rather, active layers play a role: layers by default won’t do anything unless you make them active. There is always one layer active: the default layer. If you have multiple default layers, only one can be active at a time.
You can activate layers in many ways, most of which involve special keycodes to switch and toggle layers. Two of the most used keycodes to do that are:
MO(layer)momentarily activates a layer, for as long as you hold the key. This is just like how the FN key works on most laptops.TG(layer)toggles a layer on or off, so you won’t have to hold a button down to use the layer.There are more ways to toggle layers, just follow the link above. These two are good to start out with, just know that there’s probably a keycode that can do what you want when it comes to layers.
If you define multiple of those keycodes on your default layer, it’s possible for more than one layer to be active at the same time. So how does your keyboard know what it should do when you press a key?
A quick peek inside QMK
In the example below I’ve defined three small layers for a macro pad. Let’s say we press the key on the bottom left, what happens?
When you press a key, QMK goes looking through the stack of layers, starting at the top: the layer with the highest number. It checks to see if the layer is active, meaning that we pushed a button like
MO(2)to activate the layer, or that we activated the layer programatically. In this case, we didn’t, so QMK keeps looking. The top two layers aren’t active.Since we haven’t explicitly set a default layer, the layer with the lowest number will be our default layer. The default layer is always active, and so QMK finds the keycode
KC_Z, and so it will send the letter Z to the computer.You have to define a keycode for every key on a layer, but that doesn’t need to mean every key will do something. In the Special Keys section of the documentation, you’ll find
KC_NOwhich is a keycode that does nothing, andKC_TRANSPARENTwhich means that QMK will see through that layer in order to find a keycode to send.Best practises
Under Working with layers in the documentation are some very good rules to follow, especially if you are new to layers. I’ll note two of those tips below:
0.MO(layer), only refer to layers that have a higher number than the layer you’re on.How to add a layer?
Now that you know how to work with layers, it’s time to add a layer to your keymap. If you’ve followed the steps in the Complete Newbs Guide, chances are that you already have a few layers in your keymap.
You’ll find your keymap at
/keyboards/name_of_your_keyboard/keymaps/name_of_your_keymap/keymap.c.Let’s start with a basic keymap for this example. Your keymap might contain more functions, but the basics from this example should still be there:
#include QMK_KEYBOARD_H

const uint16_t PROGMEM keymaps[][MATRIX_ROWS][MATRIX_COLS] = {
  [0] = LAYOUT( /* Base */
    KC_A,  KC_1,  KC_H, \
      KC_TAB,  KC_SPC   \
  )
};
Refer to your layer by name
In the example above, the layer number is on line 4: in
[0] = LAYOUT(,0is the layer number. You can add a#defineto your code to make it easier to refer to your layers, like so:#include QMK_KEYBOARD_H #define _BASE 0 const uint16_t PROGMEM keymaps[][MATRIX_ROWS][MATRIX_COLS] = { [_BASE] = LAYOUT( /* Base */ KC_A, KC_1, KC_H, \ KC_TAB, KC_SPC \ ) };See how we now also refer to the layer in the
keymapsvariable by its name_BASErather than its number.Add your layer
To add a layer, simply copy an existing layer and choose a different number for the index. It’s a good idea to pick a number that’s not yet used for a layer between 0 and 15.
Add your layer to the
keymapsvariable like below. You can use any keycodes on your new layer, like basic keycodes and advanced keycodes.#include QMK_KEYBOARD_H #define _BASE 0 #define _MY_LAYER 1 const uint16_t PROGMEM keymaps[][MATRIX_ROWS][MATRIX_COLS] = { [_BASE] = LAYOUT( /* Base */ KC_A, KC_1, KC_H, \ MO(_MY_LAYER), KC_SPC \ ), [_MY_LAYER] = LAYOUT( /* My new layer */ KC_F1, KC_F2, KC_F3, \ KC_TRANSPARENT, KC_BSPC \ ), };Optionally add a define to easily refer to the layer, like this:
#define _MY_NEW_LAYER 4if it’s the fourth layer, for example.Switching to your layer
There are multiple ways to switch to a layer. The most used one is to add a keycode to your layer to do so. You can find these keycodes under Switching and toggling layers.
In the example above, I added one of those keycodes to the
_BASElayer:MO(_MY_LAYER). This switches to_MY_LAYERas long as that key is held down. In the new layer, for the same key, I made the key transparent, since I can’t use that key for other things when holding it down.Conclusion
Layers are the most used way to define what each key does on a keyboard. You can have multiple layers, of which always one layer is active. You can add various keycodes to make layers active. QMK uses active layers to determine what key to send to the computer.
You now know how to add a layer and how to switch to that layer.
Further reading
All the links below point to the QMK documentation:
Share this post: